
1. Overview
This document provides guidance for customers on migrating their Fabric / Power BI tenant home region to another region using Microsoft ATM (Assisted Tenant Migration). Customers generally request ATM for data residency compliance reasons. ATM is not generally available for all Fabric / Power BI customers - it is reserved for customers that escalate, or strategically important customers. ATM preserves the tenant GUID and migrates Power BI content (datasets/models, reports, paginated reports, dashboards, dataflows Gen1) and all associated metadata over to a new region. There are three main drawbacks to ATM currently:
- Customer must delete all Fabric artifacts before ATM
- Customer must delete all capacities, in every region, including target (desired) region, before ATM
- During ATM, which takes around 6 hours on average, (check with Microsoft for an estimate for your tenant), Fabric will be inaccessible for all users
Q: “What are Power BI items?"
A: Power BI items are Semantic Models (datasets), Reports, Paginated Reports, Dashboards, and Dataflows Gen1. These are preserved during ATM.
Q: “What are Fabric artifacts?"
A: Fabric artifacts are items that are not Power BI items and include Lakehouses, Data Warehouses, Notebooks, Pipelines, Environment, CopyJob, Kusto Eventhouse, DataExploration, Dataflows Gen2, etc. Fabric artifacts must be deleted before ATM. Fabric artifacts only exist on F-SKUs (Trial & non-Trial) and P-SKUs.
If you still wish to proceed with ATM, please continue reading. Before ATM, Microsoft will first need to check that your data estate is suitable for ATM. Once confirmed that ATM is a good fit, there are four migration stages to consider:
| Stage | Performed by | Enter stage after | Start Time | Stage Duration |
|---|---|---|---|---|
| 1 | Customer | Delete of Fabric Artifacts, Cancel Trial Capacities, Delete Gateways etc. | Minimum 24 hours before start of stage 2 | At least 24 hours. Must wait for telemetry sync. |
| 2 | Customer | Delete Production Capacities | Customer picks start time (anchor start time) | Around 6 hours on average, but check with Microsoft for an estimate for your tenant. Must wait for telemetry sync. |
| 3 | Microsoft | Begin Actual Migration | Around 6 hours after the beginning of Stage 2 | Around 6 hours for actual migration of data & metadata to target region, but check with Microsoft for an estimate for your tenant. |
| 4 | Customer | Completion of Actual Migration | Around 6 hours after the beginning of Stage 3 | Around 2 hours for customer to reprovision new capacities, reattach workspaces to new capacities etc. |
The main steps to migration are:
- Customer reaches out to Microsoft account representative
- Microsoft checks to see if customer data estate is a good fit for ATM
- Microsoft creates a Teams Group Chat with customer to schedule migration (generally over a weekend) and discuss steps
- Customer picks an anchor start time for their migration which marks the beginning of Stage 2 of their migration (see table above)
- Customer deletes their Fabric artifacts (You can get list from Microsoft)
- Customer cancels all trial capacities
- Customer may need to delete on-premise data gateways in target region (confirm with Microsoft)
- Customer deletes all production (non-trial) capacities
- Microsoft initiates actual migration (takes ~6 hours)
- Customer reprovisions new capacities
- Customer reattaches workspaces to new capacities (customer needs to save capacity-workspace mapping before migration)
⚠️ Read about common migration risks here.
2. What can I do to prepare for migration?
Here is a review checklist to help you prepare for your migration.
| # | Check | Note |
|---|---|---|
| 1 | Do I have Fabric artifacts? | All Fabric artifacts, in both personal and shared workspaces, must be hard-deleted at least 24 hours before capacity deletion. The Fabric admin may need to take over personal workspaces to delete Fabric artifacts. The presence of a single Fabric artifact will block your migration. |
| 2 | How many dedicated capacities do I have? | Check Power BI Admin Portal F-SKUs are under the Fabric Capacity tabTrial F-SKUs are under the Trial tabA-SKUs are under the Power BI Embedded tabP-SKUs & EM-SKUS are under the Power BI Premium tab |
| 2.1 | Can I capture basic capacity settings and dedicated capacity-workspace mappings? | Use this PS script to capture A-SKU capacity settings Use this PS script to capture basic capacity settings (A-SKUs, F-SKUs, P-SKUs, and EM-SKUs) & workspace mappings |
| 2.2 | Do I have permission to delete all dedicated capacities the day of migration? | Only the Fabric admin can do this |
| 2.3 | Do I have permission to reprovision dedicated capacities after migration? Will I do this manually, or will I use a script? | For a small number of capacities, this could be done manually, or you could use this PS script to reprovision the same A-SKUs as before migration. We do not have scripts for reprovisioning F-SKUs, P-SKUs, and EM-SKUs. |
| 2.4 | Do I have permission to reattach all workspaces back to these newly provisioned dedicated capacities after migration? Will I do this manually, or do I have a script to do this? | Use this PS script to remap workspaces to dedicated capacities based on what was saved before migration. Requires capacities to have the same name. The capacity IDs will change, since these are new capacities. |
| 2.5 | Do I need to hand out Pro or PPU licenses to some users so they can access pro workspaces and reports during the No Capacities Stage (~6 hours). This will only work for datasets in small file format and < 1GB. | I should remember to take back these licenses after migration, when dedicated capacities are reprovisioned and reattached to workspaces - users with free licenses will then be able to access reports on those premium workspaces. |
| 2.6 | Do I use isolated dedicated capacities, that are in separate capacity infrastructure from other tenants? | Please reach out to your Microsoft account representative. |
| 2.7 | Do I use capacities with BYOK (Bring Your Own Key) | After migration, you will need to reprovision capacities with BYOK with the same key(s) as before migration. |
| 3 | Do I have on-premise data gateways in the target (desired) region? | These may need to be deleted before migration. Please confirm with Microsoft. |
| 4 | Do I have Power Apps that use gateways in the source region? | These will need to be reconfigured after migration. |
| 5 | Do I use workspaces with BYOLA (Bring Your Own Log Analytics) or BYOS (Bring Your Own Storage)? | Detach from workspaces before migration, then reattach after migration. |
| 6 | Do I want to save my logs & usage metrics? | Save reports and datasets before migration. After migration, Workspace-level Usage Metrics will not retain usage data from before migration. |
| 7 | Do I have Tenant Level or Workspace Level Private Links enabled? | Disable and remove Private Link resources before migration. |
| 8 | If I have dedicated capacities, am I using Azure Analysis Service migration? | Pause AAS migrations before home tenant migration. |
3. Migration Stages
There are four stages to be carried out in sequence.
| Stage | Performed by | Enter stage after | Number of Steps | Start Time | Stage Duration |
|---|---|---|---|---|---|
| 1 | Customer | Delete Fabric Artifacts, Cancel Trial Capacities, Delete of Gateways etc. | 9 | Minimum 24 hours before start of stage 2 | At least 24 hours. Must wait for telemetry sync. |
| 2 | Customer | Deletion of Production Capacities | 1 | Customer picks start time (anchor start time) | Around 6 hours on average, but check with Microsoft for an estimate for your tenant. Must wait for telemetry sync. |
| 3 | Microsoft | Begin Actual Migration | 1 | Around 6 hours after the beginning of Stage 2 | Around 6 hours for actual migration of data & metadata to target region, but check with Microsoft for an estimate for your tenant. |
| 4 | Customer | Completion of Actual Migration | 11 | Around 6 hours after the beginning of Stage 3 | Around 2 hours for customer to reprovision new capacities, reattach workspaces to new capacities etc. |
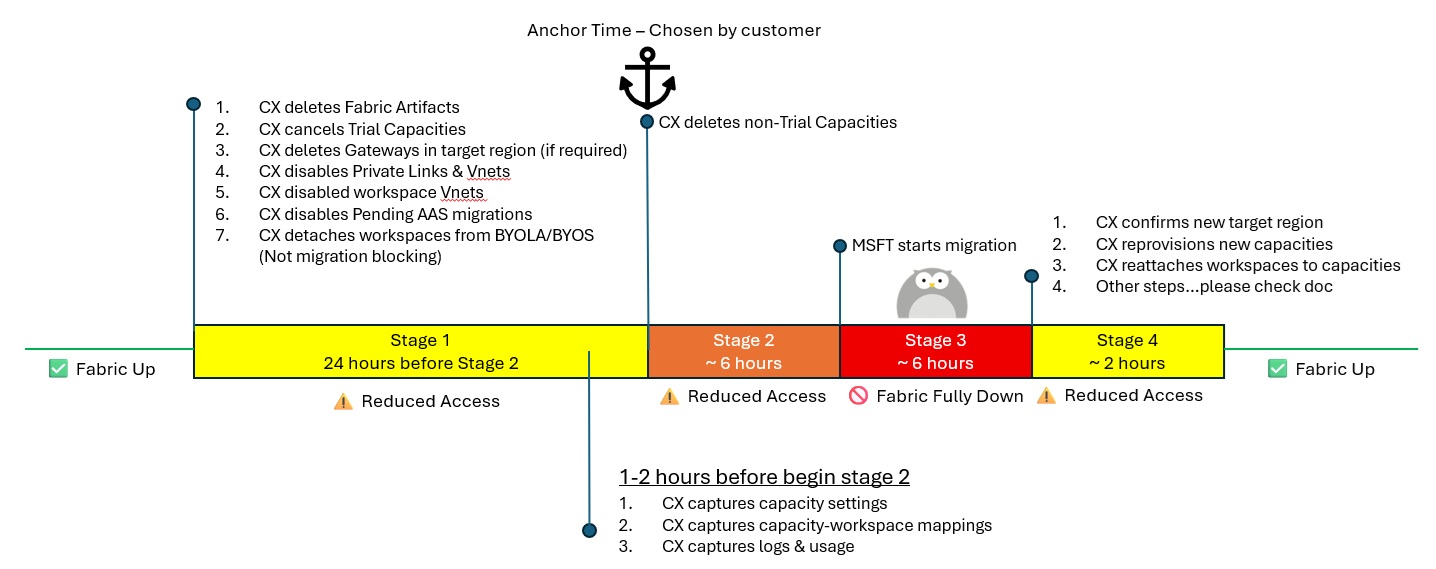
Stage 1 - Delete Fabric Artifacts, Cancel Trial Capacities, Delete Gateways etc.
Customer performs all 9 steps (where relevant) of Stage 1 in sequence, a minimum of 24 hours before anchor start time which is the beginning of Stage 2. However, Stage 1.8 and Stage 1.9 should be performed around 1 hour before beginning of Stage 2.
Stage 1.1 - Delete Fabric Artifacts
🛑 Critical step - migration blocking if not done
⌛ Do this at least 24 hours before anchor start time
🙍 Performed by customer
Q: “What are Fabric Artifacts?"
A: Power BI items are Semantic Models, Reports, Dashboards, and Dataflows Gen1. These do not need to be deleted. Fabric Artifacts are everything else e.g. Lakehouses, Data Warehouses, Notebooks, Kusto Eventhouses, DataExploration, Dataflows Gen2 etc. Fabric artifacts need to be deleted before migration. You can work with Microsoft to get a comprehensive list of Fabric artifacts in your tenant. Fabric artifacts only exist on F-SKUs (Trial & non-Trial) and P-SKUs.
Q: "How do I get an inventory of my Fabric Artifacts?"
A: You can use Public APIs, or your Microsoft account representative can provide you with a list of your Fabric artifacts. We recommend you begin inventorying your Fabric artifacts a minimum of 7 days before your anchor start time, and that you have the correct permissions to ensure they can all be deleted a minimum of 24 hours before anchor start time.
Firstly, disable creation of new Fabric artifacts via tenant setting Admin portal => Tenant settings => Microsoft Fabric => Users can create Fabric artifacts. Note that this does not block auto-creation of some Fabric artifacts like DataExploration. Next, delete all your Fabric Artifacts, across your entire tenant, across all shared and personal workspaces, across all capacities including trial. This also includes FUAM - all the Fabric artifacts in your FUAM workspace should be deleted. Immediately before deleting your dedicated capacities, ensure no Fabric artifacts have been auto-created and delete them. If you delete a capacity before deleting all the Fabric artifacts on a workspace you will need to put the workspace back on a capacity (in the same region it was before) then hard-delete the Fabric artifacts. You can also give written permission to Microsoft to delete any lingering Fabric artifacts that would block your migration.
If you want to delete a workspace, you must first delete any Fabric artifacts in the workspace. Otherwise, the Fabric artifacts will end up in a soft-delete state for 30 days, which will block your migration. You will need to work with Microsoft to identify those workspaces, then you reattach those workspaces to a dedicated capacity, then you delete the Fabric artifacts. After which, you are free to delete those workspaces. The same applies if you migrate a workspace off an F-SKU capacity (trial or non-trial) - the Fabric artifacts will enter a soft-delete state for 30 days.
Stage 1.2 - Cancel Trial Capacities
🛑 Critical step - migration blocking if not done
⚠️ Order matters - always delete your Fabric artifacts before cancelling your trial capacities
⌛ Do this at least 24 hours before anchor start time
🙍 Performed by customer
Before you cancel your trial capacities, first confirm all your Fabric artifacts have been deleted. As Fabric admin, go to Fabric admin portal => Capacity Settings => Trial and "cancel" all your Fabric Trial capacities, which is equivalent to deleting them. When you cancel trial capacities, those workspaces will automatically move back to shared capacities. Power BI access may be slower and restricted. Specifically:
- For all datasets ≥ 1GB, the dataset and all reports dependent on those datasets will be inaccessible for all users, and scheduled data refreshes will not work, until the dataset is back on a dedicated capacity after migration.
- For all datasets with large storage mode enabled, regardless of the size of the dataset, the dataset and all reports dependent on those datasets will be inaccessible for all users, and scheduled data refreshes will not work, until the dataset is back on a dedicated capacity after migration. Furthermore, the newly provisioned dedicated capacity must be in the same region as before migration.
- For all datasets < 1GB and in small storage mode, users with Free licenses will lose access to those datasets and associated reports. Only users with Pro or PPU (Premium Per User) licenses will retain their access. Users with Free licenses will regain their access once the workspace is back on a dedicated capacity after migration. If you want users to still have access to these workspaces you will need to upgrade those users to Pro or PPU user licenses.
Stage 1.3 - Delete Gateways in Target Region
🛑 Critical step - migration blocking if not done. Targeted gateways must be hard-deleted, not just soft-deleted.
⌛ Do this at least 24 hours before anchor start time
🙍 Performed by customer
Some on-premise data gateways in the target (desired) region may need to be deleted before migration. Please first confirm with your Microsoft account representative. On-premise data gateways in the target region can be used by Logic Apps, Azure Analysis Service, Power Apps, and Power Automate. They cannot be used by Power BI / Fabric which only supports on-premise data gateways in the source region.
To delete the gateways, go to Power Platform admin center => Manage => Data (preview) => On-premise data gateways. Turn on Tenant administration toggle (top right). Select target (desired) region from the drop-down (top right). Hover on the gateway, select settings from the context menu, and confirm the gateway GUID which Microsoft provided. Then soft-delete the gateway. Do this for all gateways in the target region that Microsoft tells you to delete. All the soft-deleted gateways need to be hard-deleted. Go to Deleted gateways (Preview) (top right). For each gateway under Deleted clusters, select the trash can icon to permanently delete the gateway and all its members.
Stage 1.4 - Disable Tenant Level Private Links
🛑 Critical step - migration blocking if not done
⌛ Do this at least 12 hours before anchor start time
🙍 Performed by customer
If you have private links, then minimum 12 hours before migration follow the below steps in sequence:
- Enable public internet access:
Power BI => Admin portal => Tenant settings => Public Internet Access - In the Azure portal, delete all the associated private endpoints you created
- In the Azure portal, delete the corresponding private DNS zones
- In the Azure portal, delete the private link service (should be only one). Turn on "Show hidden types" when exploring Resource Groups.
- Disable the setting:
Power BI => Admin portal => Tenant settings => Tenant-level Private Link
Disabling tenant level private links will restore public internet access - users can connect from any network, not just approved private endpoints. Data traffic to Power BI services no longer exclusively traverses Microsoft's backbone network; it can now go over public routes. After migration - you can reenable tenant level private link setting and recreate private endpoints.
Note that three things are required for tenant level private links to work:
- Tenant Level Private Link admin setting enabled
- Private Link Service (PLS) (
Microsoft.PowerBI/privateLinkServicesForPowerBI) - Private Endpoints (PEs) tied to the PLS
If you have the Fabric admin setting enabled only, or setting enabled with PLS, but no PEs, then before your migration, we will disable the setting, and delete the PLS. Since there were no PEs, there will be no degradation to your service when we disable this setting. If you have the setting enabled, with PLS, and PEs, then you, the customer, need to follow the above 5 steps and fully disable tenant level private links before migration. Failure to do so will block your migration.
Stage 1.5 - Disable Workspace VNets
🛑 Critical step - migration blocking if not done
⌛ Do this at least 24 hours before anchor start time
🙍 Performed by customer
Disable any (Managed) Private Links & VNets on your workspaces. Microsoft will provide you with the list.
Stage 1.6 - Disable Pending AAS Migrations
🛑 Critical step - migration blocking if not done
⌛ Do this at least 24 hours before anchor start time
🙍 Performed by customer
As Power BI Fabric admin go to Settings => Azure Analysis Service Migrations and look for any pending AAS migrations. They should be deleted before proceeding with the tenant migration, as it may lead to tenant migration failure. You can also utilize this provided link for comprehensive guidance on AAS migration.
Stage 1.7 - Detach Workspaces from BYOLA & BYOS
⚠️ Not blocking, but BYOLA like Azure Log Analytics will not work after migration
⌛ Do this at least 24 hours before anchor start time
🙍 Performed by customer
If you are using Bring your own Log Analytics (BYOLA) or Bring your own Storage (BYOS) then before migration, workspaces need to be detached from BYOLA like Azure Log Analytics. If this step is not followed, Azure Log Analytics will not work after the migration for those workspaces.
Stage 1.8 - Capture Capacity Settings & Workspace Mapping
⚠️ Not migration blocking, but you need to know what workspaces need to go back on dedicated capacities after migration
⌛ Recommended 1–2 hours before anchor start time
Use this PowerShell script to capture A-SKU capacity settings and this PowerShell script to capture premium workspace mapping. Once you have captured this info you can use it during the post-migration stage to reprovision dedicated capacities and reattach workspaces to those capacities. Note that not all capacity settings can be captured through APIs - some settings like Contributor Permissions and Power BI workloads will need to be manually captured before migration and manually configured when the capacities are reprovisioned after migration. Also, PPU (Premium Per User) capacities (SKU = PP3) that show up in the API response can be ignored. These are not dedicated capacities and do not need to be deleted before migration.
Stage 1.9 - Capture Logs & Usage
⚠️ Not migration blocking
⌛ Recommended 1–2 hours before anchor start time
Some usage data is not available after migration, so save the following before migration:
- Download Power BI Activity Logs before migration
- View count in Lineage view
- Data protection metrics report (Part of Purview)
- Workspace-level Usage Metrics will not retain data from before migration.
Stage 2 - Delete Production Capacities
🛑 Critical step - migration blocking if not done
⚠️ Order matters. Always delete all your Fabric artifacts before deleting your capacities
⌛ Do at start of anchor start time
🙍 Performed by customer
Before you do this, first confirm all your Fabric artifacts have been deleted. If you have dedicated capacities (F-SKUs, A-SKUs, P-SKUs, or EM-SKUs) in active or paused states in any Azure region, then you need to manually delete all these dedicated capacities. Workspaces on Pro or PPU licenses can remain as they are. All your dedicated capacities, in every region, must be deleted before migration. Do not detach workspaces from dedicated capacities before deleting the capacities i.e. do not migrate your workspaces from dedicated capacities to per-user license mode (Pro or Premium Per User (PPU)). Dedicated capacity deletion does not result in data loss. There are four types of dedicated capacity listed in the table below that you will need to delete, including how they can be deleted.
| SKU Type | Found in | Delete capacity from |
|---|---|---|
| A-SKU (Azure) | Fabric admin portal => Capacity Settings => Power BI Embedded | Azure admin portal, Azure CLI, PowerShell |
| F-SKU (Fabric) | Fabric admin portal => Capacity Settings => Fabric Capacity | Fabric Admin portal (UI), Azure Portal, Azure CLI, PowerShell |
| P-SKU (Premium)EM-SKU (Office) | Fabric admin portal => Capacity Settings => Power BI Premium | Fabric admin portal (UI)Power BI REST API (P-SKU only) The M365 billing subscription can remain - it does not need to be cancelled. |
Remember to save your capacity settings and capacity-to-premium-workspace mappings before you delete your capacities! While dedicated capacity deletion does not result in data loss, it can result in limitations to functionality to premium workspaces that have now become Pro workspaces.
- For all datasets ≥ 1GB, the dataset and all reports dependent on those datasets will be inaccessible, and scheduled dataset refreshes will not work, until the dataset is back on a dedicated capacity after migration.
- For all datasets with large storage mode enabled, regardless of the size of the dataset, the dataset and all reports dependent on those datasets will be inaccessible, and scheduled dataset refreshes will not work, until the dataset is back on a dedicated capacity after migration, and in the same region as before migration.
- For all datasets < 1GB and in small storage mode, users with Free licenses will lose access to those datasets and associated reports. Only users with Pro or PPU (Premium Per User) licenses will retain their access. Users with Free licenses will regain their access once the workspace is back on a dedicated capacity (F64 or higher, or equivalent) after migration. If you want users to have access to these workspaces during the No Capacities Stage, you will need to upgrade those users to Pro or PPU licenses.
- All semantic models on dedicated capacities with BYOK (Bring Your Own Key) will not work until they are back on dedicated capacities with BYOK, and with the same key.
When you delete an A-SKU, you stop paying upon deletion and you lose your dedicated vCores. When you reprovision an A-SKU, you start paying again and get reassigned dedicated v-Cores. When you delete an F-SKU (Fabric capacity), billing stops immediately and all Fabric Capacity Units (CUs) associated with that capacity are released. When you reprovision an F-SKU, billing resumes and a new set of CUs is allocated. Capacity IDs will change, but the capacity name can remain the same. When you delete a P-SKU, since these are licensing add-ons, your vCores go back to the pool that you're still paying for, and then will be reallocated when you reprovision new P-SKU capacities.
Run this PowerShell script: 5.3 Confirm all Dedicated Capacities Have been Deleted, to confirm all your dedicated capacities have been deleted. Failure to delete all your dedicated capacities will block your migration.
Stage 3 - Actual Migration
⌛ Will commence approximately 6 hours after anchor start time. Check with Microsoft for a more accurate estimate for your tenant.
🙍 Performed by Microsoft
For up to 6 hours (could be longer), Fabric & Power BI will be inaccessible, and will show up as under maintenance when you log in - you will be greeted by Henry the Owl. If your tenant is exceptionally large, actual migration will take longer than 6 hours. Your Microsoft account representative will inform you if this is the case for your tenant.

Stage 4 - Post-Migration
Customer performs all 11 steps (where relevant) of Stage 4 in sequence as soon as customer receives confirmation from Microsoft that migration is complete, or customer is able to confirm Stage 4.1 by themselves.
Stage 4.1 - Confirm Target Region
⌛ Can start around 12 hours after anchor start time. Check with Microsoft for a more accurate estimate for your tenant.
🙍 Performed by Customer
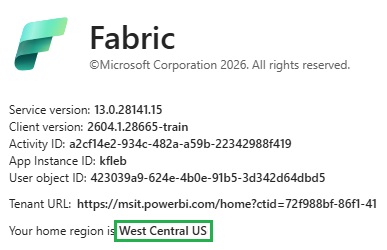
After your migration, you can confirm you have been migrated by:
- Going to the Power BI web portal
- Click the "?" icon in the top-right corner
- Select About Power BI
- Check the "Your home region is" field
It should be updated to your new region - West Central US for below example.
Stage 4.2 - Reprovision Capacities
🛑 Critical step - reports won't be accessible until this is done
⌛ Will commence around 12 hours after anchor start time. Check with Microsoft for a more accurate estimate for your tenant.
🙍 Performed by Customer
After migration you will need to reprovision dedicated capacities. Capacities will not be automatically reprovisioned after migration. Capacity IDs on your new capacities will be different to Capacity IDs on your capacities from before migration, but the capacity names can remain the same. You should have captured capacity settings before migration to aid you in this step using these two PowerShell scripts: 5.1 Save A-SKU Capacity Settings and 5.2 Save Basic Capacity Settings & Workspace Mappings.
- A-SKU (Azure Embedding) capacities can be provisioned via Azure portal (or Azure CLI/ARM templates)
- F-SKU (Fabric) capacities can be provisioned via
Fabric Admin Portal => Capacity settings => Fabric Capacity - F-SKU (Fabric Trial) capacities can be provisioned via
Fabric Admin Portal => Capacity settings => Trial - P-SKU (Premium) capacities can be provisioned via
Fabric Admin Portal => Capacity settings => Power BI Premium - EM-SKU (Enterprise Embedding) capacities can be provisioned via
Fabric Admin Portal => Capacity settings => Power BI Premium
If you only have a small number of capacities, they can be created manually, or you could use this PowerShell script to reprovision A-SKUs: 5.4 Reprovision A-SKU Capacities.
Stage 4.3 - Reattach Workspaces to Capacities
🛑 Critical step - reports won't be accessible until this is done
⌛ Will commence around 12 hours after anchor start time. Check with Microsoft for a more accurate estimate for your tenant.
🙍 Performed by Customer
After the dedicated capacities have been reprovisioned, you need to reattach workspaces to those capacities to restore full functionality. You should have captured workspace-capacity mapping before migration with this PowerShell script: 5.2 Save Basic Capacity Settings & Workspace Mappings. With the mapping file, you can reattach workspaces to capacities using this PowerShell script: 5.5 Reassign Workspaces back to Capacities. Until you reattach workspaces to capacities:
- Datasets (and associated reports) that are ≥ 1GB - the parent workspace needs to be put back on a dedicated capacity. Until they are, they will be inaccessible for all users, and scheduled dataset refreshes won't work.
- Datasets (and associated reports) that are in large file format (regardless of size) - the parent workspace needs to be put back on a dedicated capacity, and in the same region as before migration. Until they are, they will be inaccessible for all users, and scheduled dataset refreshes will not work.
- Datasets (and associated reports) that are < 1GB and in small file format - the parent workspace needs to be put back on a dedicated capacity (F64 or higher or equivalent). Until they are, access is limited to users with Pro or PPU licenses. Putting the workspace back on an appropriately sized dedicated capacity grants access for users with only Free licenses.
- Semantic models that were on dedicated capacities with BYOK (Bring Your Own Key) before migration, will not work until they are back on dedicated capacities with BYOK, and with the same key.
As part of home tenant migration, if you also want to move your workspaces to capacities in a different region read this section: 6. Tenant Migration & Workspace Migration.
Stage 4.4 - Gateways & VNets
🛑 Critical step for Power Apps that use Gateways in source region
⌛ Will commence around 12 hours after anchor start time. Check with Microsoft for a more accurate estimate for your tenant.
🙍 Performed by Customer
After migration, all gateways with their relay endpoint in the old region will continue working - the same applies to VNets scoped to the old region. You can confirm the relay endpoint by checking your gateway logs. However, because there are additional configurations on the machine that may point to the old region, the gateway software will need to be uninstalled and reinstalled before all of its capabilities are available. Public documentation is available here. You can also install a gateway on a different machine and recover there. You do not need to delete and re-create the gateway clusters or reconfigure the data source connections in the Power BI service. However, from the Power Apps perspective, gateways in the source region will be "dropped" because Power Apps keeps an explicit reference to the Power BI region where the gateway is located. This reference becomes out of date when the gateway is migrated to a new region.
For Personal Gateways (PGW) - uninstalling and reinstalling PGWs is required, along with re-entering of all credentials. PGWs do not have recovery keys, they are going to be autogenerated on the machine every time. That's why the PGW credentials will be invalidated after uninstall.
Stage 4.5 - Reenable Tenant Level Private Links
⌛ Will commence around 12 hours after anchor start time. Check with Microsoft for a more accurate estimate for your tenant.
🙍 Performed by Customer
Follow these steps to reenable Tenant Level Private Links. If you do not reenable this setting, you may not be able to sign into the gateway app. Also, reenable inbound and outbound access protection on your workspaces as required.
Stage 4.6 - Recreate Azure Analysis Service Migration
⌛ Will commence around 12 hours after anchor start time. Check with Microsoft for a more accurate estimate for your tenant.
🙍 Performed by Customer
If you deleted pending AAS migrations before the home tenant migration, you can recreate a new migration pairing. As Power BI Fabric admin go to Settings => Azure Analysis Service Migrations. Select Setup migration and follow the steps.
Stage 4.7 - Reattach Workspaces to BYOLA & BYOS
⌛ Will commence around 12 hours after anchor start time. Check with Microsoft for a more accurate estimate for your tenant.
🙍 Performed by Customer
If you are using Bring your own Log Analytics (BYOLA) or Bring your own Storage (BYOS) then after migration the workspaces should be re-attached to these services e.g. Azure Log Analytics. They should have been detached before migration.
Stage 4.8 - Analyze in Excel - Update Connection String
📢 Low probability of needing to do this
⌛ Will commence around 12 hours after anchor start time. Check with Microsoft for a more accurate estimate for your tenant.
🙍 Performed by Customer
For Excel workbooks that use the Analyze in Excel feature, after migration, if they fail to refresh you may need to update the connection string or re-download the ODC connection for that dataset, since it could contain a reference to the old home region. See this tutorial for help with this step if required. The chance of the connection string needing to be updated is very low.
Stage 4.9 - Embedded Links in SharePoint - Regenerate Links
📢 Low probability of needing to do this
⌛ Will commence around 12 hours after anchor start time. Check with Microsoft for a more accurate estimate for your tenant.
🙍 Performed by Customer
Power BI Embedded Links in SharePoint may fail to connect when migration is complete - the link could contain a reference to the old home region and would need to be updated. To resolve this problem, after migration, you must re-generate the embedded link in Power BI and then update the locations where they are used. The chance of the link needing to be regenerated is very low.
Stage 4.10 - Re-enable creation of Fabric Artifacts
⌛ Will commence around 12 hours after anchor start time. Check with Microsoft for a more accurate estimate for your tenant.
🙍 Performed by Customer
Re-enable creation of Fabric artifacts via tenant setting Admin portal => Tenant settings => Microsoft Fabric => Users can create Fabric artifacts.
Stage 4.11 - Workspace-level Usage Metrics
📢 No-op, but Workspace-level Usage Metrics from before migration will not be retained
After migration, Workspace-level Usage Metrics (UM) will begin to automatically capture data in your new region.
4. Frequently Asked Questions
Q: "What is ATM (Assisted Tenant Migration)?"
A: ATM (Assisted Tenant Migration) is a Microsoft-led process used to move a customer's Fabric / Power BI tenant home region from one Azure region to another, most commonly to meet data residency or regulatory requirements. The migration is carefully coordinated with Microsoft and typically scheduled during a maintenance window to minimize customer impact, with Microsoft handling the tenant migration while customers complete a small set of required preparation and post-migration steps. The process is designed to be safe and recoverable, using a copy-based approach so the original tenant remains intact until the migration is successfully completed. ATM is generally reserved for customers with strong compliance or regulatory drivers and is executed with close collaboration to ensure a predictable and controlled outcome. It is not generally available for all Fabric / Power BI customers.
Q: "What is Tenant Remap?"
A: Tenant Remap is a Microsoft-supported process that changes a Power BI / Microsoft Fabric tenant's home region by remapping the tenant metadata to a new Azure region. During a Tenant Remap, the tenant is recreated in the target region as a clean, empty tenant, and all existing Power BI data, Fabric artifacts, capacities, gateways, and associated metadata from the original tenant are removed as part of the process. Customers are responsible for backing up any content they wish to retain (such as reports, semantic models, or dataflows) before the remap and restoring that content after the tenant is live in the new region. The remap is executed with Microsoft Support and typically involves a short, planned downtime window while the tenant is switched to the new region. Tenant Remap is most suitable for customers with smaller or rebuildable estates, or as a foundation for backup-and-restore approaches, when full in-place tenant migration is not available or feasible. Tenant Remap is publicly available; you can read about it here.
Q: "What happens if migration fails?"
A: Your home region will roll back to the old region with no data loss. Rollback will be immediate, since the migration is copy & paste, not cut & paste, so the original metadata still remains in the old region during & after migration. After a successful migration, the metadata will eventually be deleted from the old region. Regardless of whether migration fails or succeeds, you, the customer, will need to reprovision capacities and reattach workspaces.
Q: "Why does the No Capacities Stage take 6 hours?"
A: We need to wait on capacity sync jobs that run every few hours to confirm that metadata is synced correctly and that we can start migration.
Q: "After migration will IDs such as Tenant ID, Workspace ID, Dataset ID, Report ID, Group ID, Gateway Object ID, and Data Source Connection ID change?"
A: No, those IDs will remain the same after migration.
Q: "Will Power BI dashboard or report URLs change after migration?"
A: No, they will remain the same as before migration.
Q: "During the migration, will the connections of the AnalysisServices remain under the Personal Gateways of the SPN and SPN Profile? I am referring to the personal gateways that Power BI creates by default for the user, SPN, or SPN Profile. These connections are created when we publish a semantic model or paginated report; they are not created or installed by the user."
A: Personal gateways from the source region will be transferred as a part of the tenant migration.
Q: "Will links change for externally shared Power BI dashboards and reports?"
A: No, they will remain the same as before migration.
Q: "Will gateway connections, data source connections, and credentials work after migration?"
A: Yes. However, gateways that depended on the old region before migration will continue to do so until they are reconfigured by you, the customer.
Q: "Will capacity IDs change after migration?"
A: Yes. Since new dedicated capacities will need to be reprovisioned after migration. The capacity names can be the same though.
Q: "Can I do my tenant migration in batches?"
A: No. A single tenant can only be migrated wholly.
Q: "Will scheduled refreshes work when I delete my capacities?"
A: They will only continue working for datasets that are in small file format and < 1GB in size.
Q: "Why do I have to delete my capacities in all regions?"
A: We need to delete dedicated capacities in all regions so the metadata flows back to shared capacities in the old region. Then, with everything in one place, we can migrate everything from the old region to the new region. Deleting the dedicated capacities in every region is absolutely a necessary step - failing to do so will block migration.
Q: "Why can't I detach my workspaces from capacities before deleting the capacities?"
A: After detachment, you could inadvertently delete your dedicated capacities before all workspaces and content have moved back to shared capacities - this would block migration. You can confirm everything has moved back via public APIs prior to deleting your capacities, but we strongly advise customers to simply delete capacities before migration, rather than detach workspaces, confirm, and then delete capacities.
Q: "After migration, I can't access content in my workspace."
A: The workspace was probably on a dedicated capacity before migration, so it needs to go back on a dedicated capacity. If the workspace is already on a dedicated capacity, and if the workspace has datasets in large file format, it will need to go back on a dedicated capacity in the same region as before migration.
Q: "Do scheduled refreshes block migration?"
A: No. Scheduled refreshes do not need to be paused or deleted before migration.
Q: "Can users with Pro Licenses still access reports and dashboards when the capacities are deleted?"
A: Yes, but limited to datasets in small storage mode AND < 1GB. For datasets in large storage mode or ≥ 1GB, all users, including users with Pro or PPU (Premium Per User) licenses, will need to wait for the parent workspace to be back on a dedicated capacity.
Q: "What is a dedicated capacity?"
A: Dedicated capacity refers to capacities like F-SKU (Fabric), F-SKU Trial (Fabric Trial), P-SKU (Premium), A-SKU (Azure - Embedded), EM-SKU (Office - Embedded). These are tenant-level resources that can host multiple workspaces and are centrally managed.
Q: "What is a premium workspace?"
A: A premium workspace is on a dedicated capacity (F-SKU, F-SKU Trial, P-SKU, A-SKU, or EM-SKU).
Q: "Is there a recovery key for VNet Gateways?"
A: No.
Q: "What is PP3?"
A: It's a capacity SKU for Premium Per User (PPU) licenses. If there are any PPU licenses for the Power BI tenant, there'll be one (and only one) PP3 SKU. It does not need to be deleted before migration.
Q: "Why do I need to delete my Gateways in target region before migration?"
A: If you have a Gateway in target region with the same display name as a Gateway in your source region, it will block migration. We advise customers to delete all their Gateways in the target region to prevent this blocking issue.
Q: "Why do I need to delete all my Fabric artifacts before migration?"
A: ATM (Assisted Tenant Migration) is unable to cross-region migrate Fabric artifacts today. It is a known, documented limitation of ATM.
Q: "What are Power BI items?"
A: Power BI items are Semantic Models (datasets), Reports, Paginated Reports, Dashboards, and Dataflows Gen1. These are preserved during ATM.
Q: "What are Fabric artifacts?"
A: Fabric artifacts are items that are not Power BI items and include Lakehouses, Data Warehouses, Notebooks, Pipelines, Environment, CopyJob, Kusto Eventhouse, DataExploration, Dataflows Gen2, etc. Fabric artifacts must be deleted before ATM. Fabric artifacts only exist on F-SKUs (Trial & non-Trial) and P-SKUs.
Q: "Does ATM work for workspaces with semantic models in large storage format?"
A: Yes, but those workspaces will need to go back on capacities in the same region as before migration, in order for those models (and related reports & dashboards) to be accessible after migration.
Q: "How do I get an inventory of my Fabric Artifacts?"
A: You can use Public APIs, or your Microsoft account representative can provide you with a list of your Fabric artifacts. We recommend you begin inventorying your Fabric artifacts a minimum of 7 days before your anchor start time, and that you have the correct permissions to ensure they can all be deleted a minimum of 24 hours before anchor start time.
Q: "Post-migration, will there be any impact on scheduled refreshes? Do those need to be recreated after migration?"
A: No impact. They will operate as normal after migration - they do not need to be recreated.
Q: "Can I reconfigure existing Gateways associated to remove dependency on the old region, and associated them with the new region?"
A: No. You cannot change the region of an existing Gateway. You can install a different Gateway or reinstall your existing Gateways.
5. PowerShell Scripts
These PowerShell scripts will be run by you, the customer, before or after migration.
5.1 Save A-SKU Capacity Settings
Customer (Fabric Admin) runs this before migration. Note this may not capture ALL capacity metadata. Please review the generated JSON file.
# ============================================
# Export all Power BI Embedded Capacities, does not include F-SKU, P-SKU or EM-SKU Premium capacities
# Need Azure subscription contributor role
# Change $outputFile to your path
# Run "Install-Module -Name Az" first to install necessary modules
# Please use default PowerShell v5.1 to run the script, running with PowerShell v7.0 may fail
# ============================================

# Connect to Azure Cloud
Write-Host "Connecting to Azure Prod Cloud"
Connect-AzAccount -Environment AzureCloud

# Output file path, change to your path to save the exported data
$outputFile = "C:\Users\xxxxx\A_CapacityMap.json"

# Get all Azure subscriptions you can access
$subscriptions = Get-AzSubscription
Write-Host "Found : $($subscriptions.Count) subscriptions"

$exportData = @()

foreach ($sub in $subscriptions) {
    Write-Host "`n=============================="
    Write-Host "Change to subscription: $($sub.Name) ($($sub.Id))"
    Write-Host "=============================="
    try {
        Set-AzContext -SubscriptionId $sub.Id -ErrorAction Stop | Out-Null
    } catch {
        Write-Warning "Change subscription failed: $($_.Exception.Message)"
        continue
    }

    # Get resources with type Microsoft.PowerBIDedicated/capacities
    try {
        $capacities = Get-AzResource -ResourceType "Microsoft.PowerBIDedicated/capacities" -ErrorAction Stop
    } catch {
        Write-Warning "Can't list resources for subscription $($_.Exception.Message)"
        continue
    }

    # Get sku info
    $aCapacities = $capacities | Where-Object {
        # sku info might be under .Sku or .Sku.Name
        $skuName = $null
        if ($_.Sku -and ($_.Sku.Name)) { $skuName = $_.Sku.Name } elseif ($_.Sku) { $skuName = $_.Sku }
        return $skuName #-and ($skuName -match '^A\d+')
    }

    if (-not $aCapacities -or $aCapacities.Count -eq 0) {
        Write-Host "There's no A SKU capacity in this sub"
        continue
    }

    foreach ($cap in $aCapacities) {
        Write-Host "Processing capacity: $($cap.Name) (resource group: $($cap.ResourceGroupName))"

        # Use Get-AzResource -ResourceId -ExpandProperties to read properties
        $details = $null
        try {
            $details = Get-AzResource -ResourceId $cap.ResourceId -ExpandProperties -ErrorAction Stop
        } catch {
            Write-Warning "Can not get details (Get-AzResource -ExpandProperties) : $($_.Exception.Message)"
            # Fallback to use backup Invoke-AzRest (if your module supports it)
            try {
                # build Path for Invoke-AzRest
                $relativePath = $cap.ResourceId
                $apiVersion = "2017-10-01"
                $resp = Invoke-AzRest -Path $relativePath -Method GET -ApiVersion $apiVersion -ErrorAction Stop
                $details = $resp.Content | ConvertFrom-Json
            } catch {
                Write-Warning "Calling backup REST API failed too: $($_.Exception.Message)"
                continue
            }
        }

        # Use cap.Sku to get SKU name
        $skuVal = if ($cap.Sku -and $cap.Sku.Name) { $cap.Sku.Name } elseif ($cap.Sku) { $cap.Sku } else { "" }

        $exportData += [PSCustomObject]@{
            SubscriptionId = $sub.Id
            SubscriptionName = $sub.Name
            CapacityName = $cap.Name
            ResourceGroup = $cap.ResourceGroupName
            Region = $cap.Location
            Sku = $skuVal
            ResourceId = $cap.ResourceId
        }
    }
}

if ($exportData.Count -eq 0) {
    Write-Warning "Did not find any A SKU capacity"
} else {
    $exportData | ConvertTo-Json -Depth 6 | Out-File -FilePath $outputFile -Encoding UTF8
    Write-Host "`nExported A SKU capacities in all subscriptions to: $outputFile"
}
5.2 Save Basic Capacity Settings & Workspace Mappings
Customer (Fabric Admin) runs this before migration.
# ============================================
# Run this script in Azure PowerShell to save basic capacity settings and workspace mapping to a local JSON File
# Please use default PowerShell v5.1 to run the script, run with PowerShell v7.0 may fail
# Need at least Fabric Administrator role
# Change $logpath to your path
# Run "Get-InstalledModule -Name Az", if your Az version is not 15.0.0 or above, run "Update-Module -Name Az" to update
# If you do not have Az installed, run "Install-Module -Name Az" to install necessary modules,
# ============================================

# Connect to Azure Cloud
Connect-AzAccount -Environment AzureCloud
$accessToken = (Get-AzAccessToken -AsSecureString -ResourceUrl "https://analysis.windows.net/powerbi/api").Token
$ptr = [System.Runtime.InteropServices.Marshal]::SecureStringToBSTR($accessToken)
try {
    $accessToken = [System.Runtime.InteropServices.Marshal]::PtrToStringBSTR($ptr)
} finally {
    [System.Runtime.InteropServices.Marshal]::ZeroFreeBSTR($ptr)
}

# Output file path, change to your path to save the exported data
$outputFile = "C:\Users\xxxxx\CapacityWorkspaceMap.json"

# Define headers
$headers = @{
    "Authorization" = "Bearer $accessToken"
    "Content-Type"  = "application/json"
}

# Rate limit delay (200 calls/hour = 1 call every 18 seconds)
$rateLimitDelay1 = 20
$rateLimitDelay2 = 75

# Function to get all capacities with pagination and rate limiting
function Get-AllCapacities {
    $capacities = @()
    $url = 'https://api.powerbi.com/v1.0/myorg/admin/capacities'
    do {
        $response = Invoke-RestMethod -Uri $url -Headers $headers -Method Get
        $capacities += $response.value
        $url = $response.'@odata.nextLink'
        Start-Sleep -Seconds $rateLimitDelay1
    } while ($url)
    return $capacities
}

# Function to get all workspaces with pagination and rate limiting
function Get-AllWorkspaces {
    $workspaces = @()
    $top = 1000
    $skip = 0
    do {
        $url = "https://api.powerbi.com/v1.0/myorg/admin/groups?`$top=$top&`$skip=$skip"
        Write-Host "Calling: $url"
        $response = Invoke-RestMethod -Uri $url -headers $Headers -Method Get
        $batch = $response.value
        $workspaces += $batch
        $skip += $top
        Start-Sleep -Seconds $rateLimitDelay2
    }
    while ($batch.Count -gt 0)

    return $workspaces
}

# Exclude Premium Per User & Fabric Trial Capacities
$capacities = Get-AllCapacities | Where-Object { $_.sku -ne "PP3" -and $_.sku -notlike "FT*" }

$allWorkspaces = Get-AllWorkspaces

# Group workspaces by capacityId, saving only workspace IDs and full capacity metadata
$groupedData = @()
foreach ($capacity in $capacities) {
    $capacityId = $capacity.id
    $workspaceIds = ($allWorkspaces | Where-Object { $_.capacityId -eq $capacityId }).id
    $groupedData += [PSCustomObject]@{
        CapacityId   = $capacityId
        CapacityName = $capacity.displayName
        Metadata     = $capacity
        WorkspaceIds = $workspaceIds
    }
}

# Output to JSON
$groupedData | ConvertTo-Json -Depth 10 | Out-File -FilePath $outputFile -Encoding utf8
Write-Host "`nData exported to: $outputFile"
5.3 Confirm all Dedicated Capacities Have been Deleted
Customer (Fabric Admin) runs this before migration.
# ============================================
# Run this script in Azure PowerShell to check capacities in your tenant
# Need at least Fabric Administrator role
# Please use default PowerShell v5.1 to run the script, running with PowerShell v7.0 may fail
# Run "Install-Module -Name MicrosoftPowerBIMgmt" to install necessary modules
# ============================================

# SIGN INTO POWER BI PROD, WITH AT LEAST FABRIC ADMIN ROLE
# Connect-PowerBIServiceAccount -Environment Public (This should also work)
Connect-PowerBIServiceAccount

# Call ADMIN CAPACITIES API
$capacities = Invoke-PowerBIRestMethod -Url "admin/capacities" -Method GET | ConvertFrom-Json

# Exclude Premium Per User (PPU) capacities AKA PP3
$filteredCaps = $capacities.value | Where-Object { $_.sku -ne "PP3" }

if ($filteredCaps.Count -eq 0) {
    Write-Output "No capacities found"
}
else {
   Write-Output "Capacities found:"
   $filteredCaps | Select-Object displayName, sku
   Write-Output "`nPlease backup configurations and delete them before migration"
}
5.4 Reprovision A-SKU Capacities
Customer (Fabric Admin) runs this after migration. References file A_CapacityMap.json that was captured previously from 5.1 Save A-SKU Capacity Settings.
# ============================================
# Create capacities based on A_CapacityMap.json
# Need to manually set at least one capacity administrator for each capacity
# Need Azure subscription contributor role
# Change $jsonFilePath and $logPath to your path
# Run "Install-Module -Name Az" first to install necessary modules
# Please use default PowerShell v5.1 to run the script, running with PowerShell v7.0 may fail
# ============================================

# Connect to Azure Cloud
Write-Host "Connecting to Azure Prod Cloud"
Connect-AzAccount -Environment AzureCloud

# Change jsonFilePath to your path
$jsonFilePath = "C:\Users\xxxxx\A_CapacityMap.json"
$capacityMap = Get-Content -Raw -Path $jsonFilePath | ConvertFrom-Json

foreach ($item in $capacityMap) {
    $subscriptionId = $item.SubscriptionId
    $name = $item.CapacityName
    $region = $item.Region
    $sku = $item.Sku
    $resourceGroup = $item.ResourceGroup

    Write-Host "`n=============================="
    Write-Host "Creating capacity $name ($sku, $region)"
    Write-Host "Subscription: $subscriptionId"
    Write-Host "Resource group: $resourceGroup"
    Write-Host "=============================="

    Set-AzContext -SubscriptionId $subscriptionId | Out-Null

    $existing = Get-AzResource -ResourceType "Microsoft.PowerBIDedicated/capacities" `
                               -ResourceGroupName $resourceGroup `
                               -Name $name `
                               -ErrorAction SilentlyContinue
    if ($existing) {
        Write-Host "Existing: $name"
        continue
    }

    try {
        New-AzPowerBIEmbeddedCapacity -ResourceGroupName $resourceGroup `
                       -Name $name `
                       -Location $region `
                       -Sku $sku | Out-Null
        Write-Host "Created: $name"
    } catch {
        Write-Warning "Creation failed: $($_.Exception.Message)"
        continue
    }
}

# All done
Write-Host "`nCreated embedded capacities for all subscriptions"
5.5 Reassign Workspaces back to Capacities (Batch)
Customer (Fabric Admin) runs this after migration. References file CapacityWorkspaceMap.json that was captured previously from 5.2 Save Basic Capacity Settings & Workspace Mappings. Matches on capacity name, since capacity ID will have changed.
# ============================================
# Assign capacity back to workspaces based on CapacityWorkspaceMap.json
# Uses Admin API: POST /admin/capacities/AssignWorkspaces
# Batch size: 100 workspaces per request
# Rate limit: 200 requests per hour (per tenant)
# Adds: automatic retries for failed batches (exponential backoff + jitter)
# ============================================

# Connect to Power BI
# Connect-PowerBIServiceAccount -Environment Public (This should also work)
Connect-PowerBIServiceAccount

$jsonFilePath = "C:\Users\xxxxx\CapacityWorkspaceMap.json"
$capacityMap  = Get-Content -Raw -Path $jsonFilePath | ConvertFrom-Json

$allCapacities = Get-PowerBICapacity -Scope Organization

# --- Controls ---
$batchSize = 100

# Admin endpoint limit: 200/hour for POST /admin/capacities/AssignWorkspaces
$maxRequestsPerHour = 200
$windowSeconds      = 3600
$requestTimestamps  = New-Object System.Collections.Generic.List[DateTime]

# Retry controls
$maxRetries    = 5
$baseBackoffS  = 5   # base delay seconds for retry backoff

# Track permanently failed batches for follow-up
$failedBatches = New-Object System.Collections.Generic.List[object]

function Enforce-RateLimit {
    param(
        [int]$MaxPerHour,
        [int]$WindowSeconds,
        [System.Collections.Generic.List[DateTime]]$Timestamps
    )

    $now = Get-Date

    # prune timestamps outside rolling window
    for ($i = $Timestamps.Count - 1; $i -ge 0; $i--) {
        if (($now - $Timestamps[$i]).TotalSeconds -ge $WindowSeconds) {
            $Timestamps.RemoveAt($i)
        }
    }

    if ($Timestamps.Count -ge $MaxPerHour) {
        $oldest = ($Timestamps | Sort-Object)[0]
        $sleepFor = [Math]::Ceiling(($WindowSeconds - ($now - $oldest).TotalSeconds) + 1)
        if ($sleepFor -gt 0) {
            Write-Host "Rate limit hit ($($Timestamps.Count)/$MaxPerHour in last hour). Sleeping $sleepFor seconds..."
            Start-Sleep -Seconds $sleepFor
        }
    }
}

function Invoke-AssignBatchWithRetry {
    param(
        [string]$CapacityName,
        [string]$CapacityId,
        [string[]]$WorkspaceBatch,
        [int]$MaxRetries,
        [int]$BaseBackoffSeconds,
        [int]$MaxPerHour,
        [int]$WindowSeconds,
        [System.Collections.Generic.List[DateTime]]$Timestamps
    )

    $attempt = 0
    $lastErr = $null

    while ($attempt -le $MaxRetries) {
        # Enforce hourly throttling before each attempt
        Enforce-RateLimit -MaxPerHour $MaxPerHour -WindowSeconds $WindowSeconds -Timestamps $Timestamps

        $bodyObj = @{
            capacityMigrationAssignments = @(
                @{
                    targetCapacityObjectId = $CapacityId
                    workspacesToAssign     = @($WorkspaceBatch)
                }
            )
        }
        $bodyJson = $bodyObj | ConvertTo-Json -Depth 6

        try {
            Write-Host "AssignWorkspaces attempt $($attempt+1)/$($MaxRetries+1) | Capacity: $CapacityName | BatchSize: $($WorkspaceBatch.Count)"
            Invoke-PowerBIRestMethod -Url "admin/capacities/AssignWorkspaces" -Method Post -Body $bodyJson | Out-Null
            $Timestamps.Add((Get-Date))   # count the request (successful)
            return $true
        }
        catch {
            $lastErr = $_.Exception.Message
            $Timestamps.Add((Get-Date))   # count the request (failed also consumes quota in practice)
            Write-Warning "Batch failed (attempt $($attempt+1)): $lastErr"
        }

        $attempt++

        if ($attempt -le $MaxRetries) {
            # exponential backoff + jitter
            $backoff = [Math]::Min(600, ($BaseBackoffSeconds * [Math]::Pow(2, ($attempt - 1))))
            $jitter  = Get-Random -Minimum 0 -Maximum 6
            $sleepS  = [int]($backoff + $jitter)
            Write-Host "Retrying batch after $sleepS seconds..."
            Start-Sleep -Seconds $sleepS
        }
    }

    # Exhausted retries
    $failedBatches.Add([pscustomobject]@{
        CapacityName  = $CapacityName
        CapacityId    = $CapacityId
        WorkspaceIds  = @($WorkspaceBatch)
        Error         = $lastErr
        FailedAt      = (Get-Date).ToString("s")
    }) | Out-Null

    return $false
}

foreach ($item in $capacityMap) {
    $oldCapacityName = $item.CapacityName
    $workspaceIds    = $item.WorkspaceIds

    if ($workspaceIds -is [string]) { $workspaceIds = @($workspaceIds) }
    if (-not $workspaceIds -or $workspaceIds.Count -eq 0) { continue }

    $newCapacity = $allCapacities | Where-Object { $_.DisplayName -eq $oldCapacityName } | Select-Object -First 1
    if (-not $newCapacity) {
        Write-Warning "Cannot find capacity: $oldCapacityName"
        continue
    }

    Write-Host "Processing Capacity: $oldCapacityName (New ID: $($newCapacity.Id))"

    for ($i = 0; $i -lt $workspaceIds.Count; $i += $batchSize) {
        $end   = [Math]::Min($i + $batchSize - 1, $workspaceIds.Count - 1)
        $batch = $workspaceIds[$i..$end]

        $ok = Invoke-AssignBatchWithRetry `
            -CapacityName $oldCapacityName `
            -CapacityId "$($newCapacity.Id)" `
            -WorkspaceBatch @($batch) `
            -MaxRetries $maxRetries `
            -BaseBackoffSeconds $baseBackoffS `
            -MaxPerHour $maxRequestsPerHour `
            -WindowSeconds $windowSeconds `
            -Timestamps $requestTimestamps

        if ($ok) {
            Write-Host "Batch completed: $($i / $batchSize + 1)"
        }
        else {
            Write-Warning "Batch permanently failed after retries: Capacity=$oldCapacityName | Index=$i..$end"
        }
    }
}

# Write failed batches to a JSON file for follow-up rerun
if ($failedBatches.Count -gt 0) {
    $failedPath = "C:\Users\xxxxx\Logs\AssignWorkspaces-FailedBatches-$(Get-Date -Format 'yyyyMMdd-HHmmss').json"
    ($failedBatches | ConvertTo-Json -Depth 6) | Out-File -FilePath $failedPath -Encoding UTF8
    Write-Warning "Some batches failed permanently. Saved details to: $failedPath"
} else {
    Write-Host "All batches completed successfully."
}
5.6 Reassign Workspaces back to Capacities (Single)
Customer (Fabric Admin) runs this after migration. References file CapacityWorkspaceMap.json that was captured previously from 5.2 Save Basic Capacity Settings & Workspace Mappings. Matches on capacity name, since capacity ID will have changed. Note, since this assigns workspaces back one-by-one, be aware of hitting the API limit of 200 calls per hour.
# ============================================
# Assign capacity (excludes Fabric Trial) back to workspaces one-by-one based on CapacityWorkspaceMap.json
# Change $jsonFilePath and $logPath to your path
# Need at least Fabric Administrator role
# Run "Install-Module -Name MicrosoftPowerBIMgmt" to install necessary modules
# Please use default PowerShell v5.1 to run the script, running with PowerShell v7.0 may fail
# ============================================

# Sign in to Power BI as admin user
# Connect-PowerBIServiceAccount -Environment Public (This should also work)
Connect-PowerBIServiceAccount

# Change jsonFilePath to your path
$jsonFilePath = "C:\Users\xxxxx\CapacityWorkspaceMap.json"
$capacityMap = Get-Content -Raw -Path $jsonFilePath | ConvertFrom-Json

# === Step 2: Get all capacities in tenant ===
$allCapacities = Get-PowerBICapacity -Scope Organization

# === Step 3: Get capacity workspace mappings ===
foreach ($item in $capacityMap) {
    $oldCapacityName = $item.CapacityName
    $workspaceIds = $item.WorkspaceIds

    # Convert format
    if ($workspaceIds -is [string]) {
        $workspaceIds = @($workspaceIds)
    }

    # Find new capacity with same name
    $newCapacity = $allCapacities | Where-Object { $_.DisplayName -eq $oldCapacityName }

    if (-not $newCapacity) {
        Write-Warning "Can not find capacity:$oldCapacityName"
        continue
    }

    Write-Host "Processing Capacity: $oldCapacityName (New ID: $($newCapacity.Id))"

    # === Step 4: assign workspace to capacity one by one ===
    foreach ($wsId in $workspaceIds) {
        try {
            Write-Host "Assigning Workspace [$wsId] to Capacity [$oldCapacityName]..."
            Set-PowerBIWorkspace -Id $wsId -CapacityId $newCapacity.Id -Scope Organization
            Write-Host "Completed"
        } catch {
            Write-Warning "Failed:$($_.Exception.Message)"
        }
    }
}
6. Tenant Migration & Workspace Migration
After your tenant migration, if you want to put your workspaces back on a capacity in a different region from before migration, please read this section as additional work may be required. Consider a workspace (WS1) that is on a capacity in Region1 before tenant migration, but after migration, customer wants to put WS1 back on a capacity in Region2. Before migration, all datasets in WS1 in large file format need to be converted to small file format. This can be done via:
- UI for each dataset (Semantic model), and toggling
Large semantic model storage formatto off. - API for each dataset, and updating
targetStorageModevalue fromPremiumFilestoAbf. Note API only works for shared workspaces. It does not work for personal workspaces.
# === Switch a single dataset from large file format (PremiumFiles) to small file format (Abf) ===
# === Will not work on a personal workspace ===
# === Will not work if dataset > 10 GB ===
Connect-PowerBIServiceAccount
$workspaceID = "368da6e4-2366-4152-9d4b-4048d8d93da5"
$datasetID = "e3204660-3e98-4c54-810d-02cbe2d88f95"
$body = @{targetStorageMode = "Abf"} | ConvertTo-Json
Invoke-PowerBIRestMethod `
      -Method Patch `
      -Url "groups/$workspaceId/datasets/$datasetID" `
      -Body $body `
      -ContentType "application/json"
However, you will not be able to do this for datasets ≥ 10GB in size. You will first need to reduce the size of these datasets to < 10GB before you can switch them to small file format, or you can delete them and republish the datasets after migration. Once WS1 has all datasets in small file format, you delete the capacity in Region1, undergo tenant migration, then provision a new capacity in Region2 and reattach WS1 to it.
If, before migration, there remain one or more datasets in large file format, regardless of the size of the actual datasets, then after migration, WS1 needs to go back on a capacity in Region1. If you attach WS1 to a capacity in Region2, you won't be able to access content and will encounter a warning. You could put WS1 temporarily back on a dedicated capacity in Region1, shrink or delete any ≥ 10 GB datasets, switch all datasets to small file format, then reattach it to a dedicated capacity in Region2.
7. Migration Risks ⚠️
Common pitfalls during ATM that customers should pay close attention to.

7.1 Workspace deletion before Fabric artifact Deletion (Before Migration)
Workspace deletion is not required before tenant migration. However, if you choose to delete a workspace, you need to delete the Fabric artifacts in that workspace before deleting the workspace. If you delete the workspace first, the Fabric artifacts go into a soft-delete state for 30 days. Soft-deleted Fabric artifacts will block your tenant migration. To remedy this issue, you will need Microsoft's assistance to resurrect those workspaces. You must then reattach those workspaces to a dedicated capacity and delete the Fabric artifacts, after which you are free to delete the workspaces.
7.2 Fabric artifacts not deleted before capacity deletion (Before Migration)
Before capacity deletion, which triggers workspace migration back to shared capacity, all Fabric artifacts need to be deleted. Failure to first delete the Fabric artifacts results in those Fabric artifacts going into a soft-delete state for 30 days. Soft-deleted Fabric artifacts will block your tenant migration. Even with the tenant setting disabled, some Fabric artifacts can be auto-created under the hood. Ensure all Fabric artifacts are deleted before you delete your capacities. Otherwise, put the parent workspace back on a capacity (in the same region it was before) then hard-delete all Fabric artifacts. You can also give permission to Microsoft to delete any lingering Fabric artifacts that would otherwise block your tenant migration.
7.3 Workspace migration before capacity deletion (Before Migration)
Before tenant migration, the guidance is to simply delete your dedicated capacities. However, if you migrate your workspaces to per-user license mode, and do not wait a sufficient amount of time before deleting your dedicated capacities, you can end up with workspaces and datasets in an orphaned state. If this happens, you will be blocked from migrating. Furthermore, you will need to reach out to Microsoft to repair the orphaned workspaces and datasets. The guidance is to simply delete your trial capacities 24 hours before anchor start time (start of Stage 2), and your non-trial capacities at anchor start time.
7.4 Workspaces back on capacities in different region (After Migration)
After migration, if the workspace has datasets in large file format, they need to go back on dedicated capacities in the same region as before migration. Otherwise, you'll encounter an error indicating that the workspace is inaccessible. To fix this issue, delete the capacity, reprovision a new capacity in the same region as before migration, and put the workspaces on that new capacity.
7.5 Forget to delete Capacities (Before Migration)
Before migration, customers can forget to delete their dedicated capacities. If this happens, the customer will miss their scheduled migration window, and we will need to reschedule the migration. You can also request that Microsoft delete your dedicated capacities before migration. Please note that Microsoft cannot reprovision new capacities after migration - the customer must do that. If you ask Microsoft to delete your capacities, ensure you have a Fabric admin ready to reprovision them after your migration is complete.
Back to Top